Close

Page 22 of 43 FirstFirst ... 12202122232432 ... LastLast
Results 211 to 220 of 449

Hybrid View

Previous Post Previous Post   Next Post Next Post
  1. #1
    Senior Member
    Join Date
    Feb 2014
    Location
    MD/PA line
    Posts
    425
    Quote Originally Posted by UselessPickles View Post
    I found that the connections between the turbine housing, turbo feed pipe, wastegate and downpipe all didn't want to easily match up to each other. I got the best results by doing this:

    1) Loosen all exhaust connections from the turbo back to the head of the engine, including loosening the V-band clamp connecting the the down pipe to the turbine housing, and the 4 bolts holding the turbine to the turbo feed pipe. Loosen the head pipe bolts and ball joints just enough to allow sliding/rotating movement. Loosen everything else more to allow large amounts of movement (especially the 4 bolts holding the turbine to the feed pipe).
    3) Double check that the wastegate is perfectly seated onto the turbo feed pipe, and put the clamp on (squeeze the clamp into place with pliers, but don't tighten yet).
    4) Get the other end of the wastegate firmly seated into the down pipe, and put the clamp on (squeeze the clamp into place with pliers, but don't tighten yet).
    5) Wastegate should be guaranteed to be properly seated and leak-free now.
    6) Mate the turbine housing to the downpipe and partially tighten the v-band clamp. The goal is to have the clamp prevent the joint from separating, but allow it to rotate if necessary. It should be easy get this joint to line up flush because of all the slack in the connection between the turbine housing and the feed pipe. Loosen those 4 bolts more if necessary to get enough slack.
    7) Lightly snug up all 4 bolts (but don't tighten!) holding the turbine housing to the feed pipe. The short flex pipe between the wastegate and downpipe will get flexed/stretched slightly as necessary as these bolts are snugged.
    8) Finish tightening the v-band clamp for the down pipe, and tighten the wastegate clamps.
    9) At this point, the turbo, wastegate and downpipe should be all locked together as one complete assembly, with all joints completely sealed. There should be no other possible orientation of all these interconnected joints.
    10) Loosen the 2 bolts holding the down pipe to the engine. Have someone apply pressure to the turbo to make sure the whole system is shifted as far upward and toward left side of the vehicle as possible as you re-tighten those 2 bolts (reduces contact between the air filter and right-side inner fender liner).
    11) Confirm that the air filter will not be too far forward or rearward, contacting anything (like the trimmed air box support). If necessary, have someone apply pressure forward or rearward on the turbo as you tighten the 4 bolts holding the turbine to the feed pipe.
    12) At this point, the main turbo system should be locked into place where it should be relative to the engine, via the 3 mounting points to the engine. The rest of the exhaust system back to the engine should now just be in whatever orientation is necessary to allow the turbo system to be where it needs to be.
    13) Tighten the pipes to the heads of the engine.
    14) Tighten the ball joints in the exhaust.

    I hope After going about it differently the first go round..this is almost exactly how we achieved success in alignment. Excellent write up that I hope modifies/supplements future versions of Prodigy's install manual.

    Your Steps 6 and 10 were critical steps for our install, having done it differently the first time. Adding to step 14, we definitely had to use the impact to get a nice tight seal on those ball joints. I love those joints for their ability to flex around and still get a solid seal.

  2. #2
    Let's take another look at this coolant reservoir:


    The vent for the reservoir is just directly on top of the reservoir, at bumper level. Not only is this pretty low for a vent on a Jeep that may go in deep water, but it's quite exposed to rain water that runs down behind the bumper. The filtered cap will keep debris out, but water runs right through it (I tested!). I found this to be unacceptable, but easy to fix.


    That's about 4 or 5 feet of 7/32" vacuum hose and a 1/8" male NPT to 1/4" hose adapter, from a local auto parts store. Just replace the filter cap on the reservoir with the hose fitting.


    And run the vent hose along the same path as the coolant overflow hose:


    No more worries about getting dirty water into the coolant system.


    Follow this link to skip to the next post with installation details: http://jeeplab.com/showthread.php?13...ull=1#post3589


    -------- UPDATE --------

    New location for the coolant reservoir is much better:

    Last edited by UselessPickles; 12-02-2017 at 11:19 AM.

  3. #3
    Ok. I am done with the install. Thanks Jeff and everyone. Started the vehicle and got several codes (check engine) manage to clear them. Started driving and had a bad throttle response with another check engine code P2173 (throttle actuator control system - high air flow detected. Cant drive it Had to put my car on a recovery to get it home 
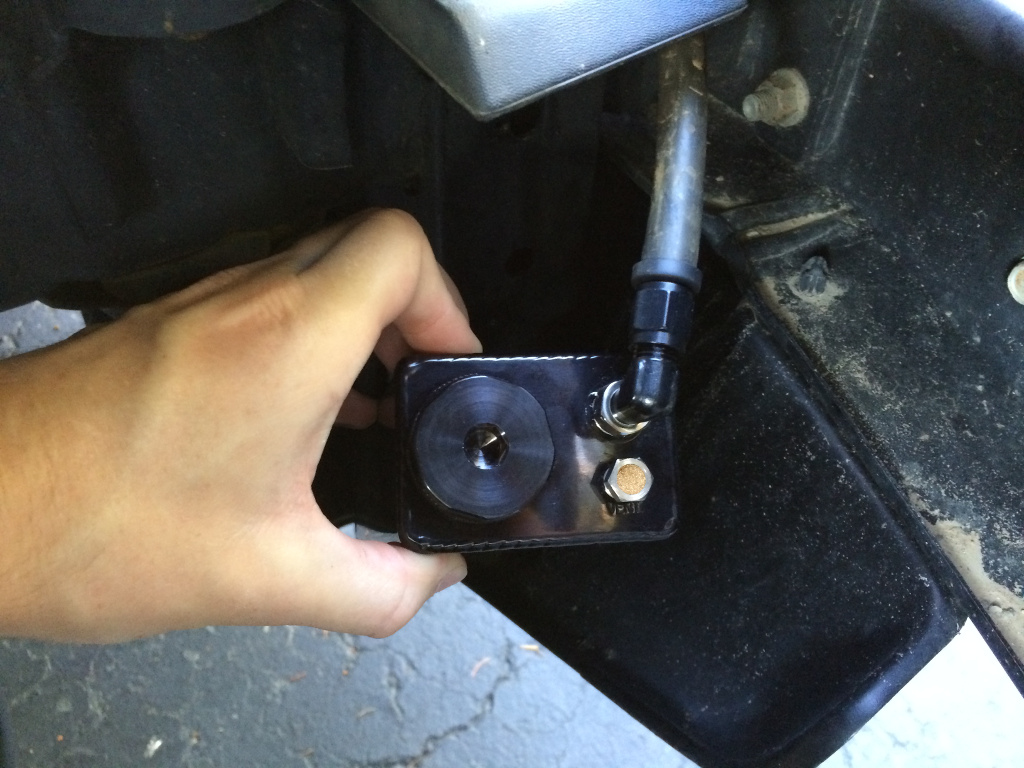
. I will contact PD , i might done something wrong.

  4. #4
    A vacuum leak can cause that code. Double check all hoses that connect to the intake manifold. I really hope you didn't mangle any of the intake manifold gaskets while reinstalling it.

  5. #5
    Quote Originally Posted by UselessPickles View Post
    A vacuum leak can cause that code. Double check all hoses that connect to the intake manifold. I really hope you didn't mangle any of the intake manifold gaskets while reinstalling it.
    As instructed i have connected the passenger side pcv to the intake with chk valve pointing towards the intake and the breather to atmosphere. I am sure that I haven't mangel the seal. The O2 sensors the driver side up-stream white and down black and vise versa on passenger side. I have sent PD my back up file and last tune ( they are so helpful) hope to get the right tune. As I stated before that i have another problem cause i have artech reinforcements kit installed and i have almost 3/4 of an inch clearance plus the return line is so close to it. The only way is aether i cut it or buy another branded axel housing.

  6. #6

    Air in coolant!

    As the temperature started dropping with the change from summer to autumn over the past several weeks, I started hearing water "rushing" sounds behind the glovebox every time I started the engine, but only if the engine was cold.

    After letting the engine cool down, I would open the radiator cap and find that it was a bit low on coolant. At first I just tried topping it off and burping air out of the system, but the problem would just come back after the next full warm-up/cool-down cycle.

    I couldn't find any signs of leaking. Scary possibilities started running through my mind, like a slightly failed head gasket either allowing coolant to be burned, or allowing combustion gasses into the coolant.

    The total amount of coolant in the system (including the reservoir) seemed to be stable, so that ruled out leaks and burning of coolant. But somehow air gets into the system. I finally decided to just go through and re-tighten all the heater hose clamps (all connections on the new heater hoses that are part of the turbo kit).

    The water rushing sound diminished with each warm-up/cool-down cycle after this, and was completely gone after about 2-3 days! It's now been several days with no problems. I'm guessing that a combination of cooler weather causing more extreme temperature swings in the rubber hoses, along with the hose developing a "memory" of the clamp compression, caused the connections to loosen up just enough that air could be sucked in past those connections as the coolant cooled down and contracted, but not loose enough to allow coolant to leak out.

    I wonder if it might have been better to use re-use the original spring clamps, which will maintain a steady clamping force even as the hose compresses and develops a "memory". At this point, it's not worth the effort and mess to pull all those hose connections apart and swap clamps. I just hope I don't ever have to re-tighten them again.

  7. #7
    Quote Originally Posted by UselessPickles View Post
    As the temperature started dropping with the change from summer to autumn over the past several weeks, I started hearing water "rushing" sounds behind the glovebox every time I started the engine, but only if the engine was cold.

    After letting the engine cool down, I would open the radiator cap and find that it was a bit low on coolant. At first I just tried topping it off and burping air out of the system, but the problem would just come back after the next full warm-up/cool-down cycle.

    I couldn't find any signs of leaking. Scary possibilities started running through my mind, like a slightly failed head gasket either allowing coolant to be burned, or allowing combustion gasses into the coolant.

    The total amount of coolant in the system (including the reservoir) seemed to be stable, so that ruled out leaks and burning of coolant. But somehow air gets into the system. I finally decided to just go through and re-tighten all the heater hose clamps (all connections on the new heater hoses that are part of the turbo kit).

    The water rushing sound diminished with each warm-up/cool-down cycle after this, and was completely gone after about 2-3 days! It's now been several days with no problems. I'm guessing that a combination of cooler weather causing more extreme temperature swings in the rubber hoses, along with the hose developing a "memory" of the clamp compression, caused the connections to loosen up just enough that air could be sucked in past those connections as the coolant cooled down and contracted, but not loose enough to allow coolant to leak out.

    I wonder if it might have been better to use re-use the original spring clamps, which will maintain a steady clamping force even as the hose compresses and develops a "memory". At this point, it's not worth the effort and mess to pull all those hose connections apart and swap clamps. I just hope I don't ever have to re-tighten them again.
    I have that same sound when the engine is cold and i start up the jeep. Fluid rushing through the hoses.. Only when the engine is cold.. Which hoses did you re-tighten, i will have to do the same.. but im not sure which ones to look for since i did not do the install.. Jeff and you send pics to me or describe which hoses im to look for? thanks!

  8. #8
    It's the two hoses that run up the middle of this picture, connecting to the heater core:


    Just tighten up all the hose clamps related to those two hoses. Snug them up good, but don't over-tighten. You'll know that you over-tightened when the worm gear skips a tooth. If that happens, it's time to get a new clamp, which can be found at any hardware store. Luckily, this style of clamp can be completely opened up to be removed/installed around the hose without disconnecting the hose, so it's not that big of a deal if you have to replace a clamp.

  9. #9
    Quote Originally Posted by UselessPickles View Post
    It's the two hoses that run up the middle of this picture, connecting to the heater core:


    Just tighten up all the hose clamps related to those two hoses. Snug them up good, but don't over-tighten. You'll know that you over-tightened when the worm gear skips a tooth. If that happens, it's time to get a new clamp, which can be found at any hardware store. Luckily, this style of clamp can be completely opened up to be removed/installed around the hose without disconnecting the hose, so it's not that big of a deal if you have to replace a clamp.
    Just checked my clamps..i was able to tighten them 2 rotations.. they were a bit loose. Whats that breather you have hooked up to?

  10. #10
    Good news
    I have done a silly mistake by installing the MAP sesor plug the otherway around. Now everything thing is good. I like it. PD team helped me and i thank them. Thanks to Jeff for giving a guide for trouble shooting. About the water sound behind the dash , i heard it too.

Posting Permissions

  • You may not post new threads
  • You may not post replies
  • You may not post attachments
  • You may not edit your posts
  •