Close

Page 1 of 5 123 ... LastLast
Results 1 to 10 of 47
  1. #1
    Senior Member
    Join Date
    Feb 2014
    Location
    MD/PA line
    Posts
    425

    Metalcloak Gamechanger install and thoughts and first 200 miles of driving!

    Over the last week my Rubicon has undergone some significant changes, the most important being the installation of Metalcloak's Gamechanger 3.5 inch suspension lift with 6-pack shocks. The Gamechanger offered me 14" of wheel shock travel in a bolt on system - which is unheard of and unmatched as far as I know. Anyway. I thought I'd share some pictures of my install process here and there. Extensive testing and off-road use will follow, but this is day one of having it on the road. Just had to share!

    Here is Jesse's girl pulling into the bay preparing to lose some parts!

    Click image for larger version. 

Name:	P1020441.jpg 
Views:	238 
Size:	94.7 KB 
ID:	367

    This is the Gamechanger 3.5 inch system's components

    Click image for larger version. 

Name:	gamechanger system.jpg 
Views:	215 
Size:	74.8 KB 
ID:	368

    Wheels off, and stock axle coming down!

    Click image for larger version. 

Name:	P1020442.jpg 
Views:	235 
Size:	93.6 KB 
ID:	369

  2. #2
    Senior Member
    Join Date
    Feb 2014
    Location
    MD/PA line
    Posts
    425
    Metalcloak's setup is unique - the shocks are probably the most spectacular part of the whole deal both visually and functionally.

    Check out how good looking these were, even in the box!

    Click image for larger version. 

Name:	2013-12-06 10.09.14.jpg 
Views:	222 
Size:	90.7 KB 
ID:	370

    You can read about the shocks all over the place, but the concept is that shock shafts extend both north and south out of the shock body giving twice the stroke of a normal shock. As it compresses, the short shock body doesn't serve as your limitation for compression or travel. Pretty cool.

    They're pretty fat shocks as shocks go, but Metalcloak has bolt on mounts included that let you slap them in like a no-brainer. There are a few adjustments you make to keep them from slapping around, but they aren't too bad.

    Metalcloak also zinc plates most of the hardware for corrosion resistance. The shock mounts are no different but check out how beefy some of the parts are compared to stock, and adjustable too.
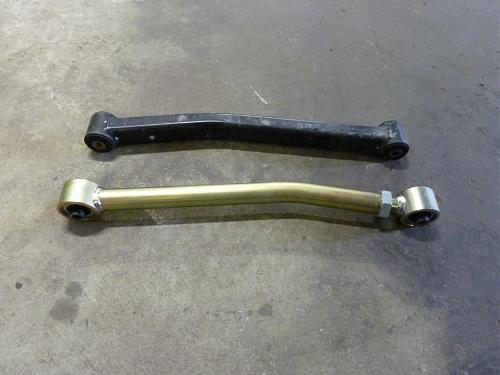
    Click image for larger version. 

Name:	P1020443.jpg 
Views:	214 
Size:	92.4 KB 
ID:	371

  3. #3
    Senior Member
    Join Date
    Feb 2014
    Location
    MD/PA line
    Posts
    425
    I wonder how long these will stay this pretty!?!

    Click image for larger version. 

Name:	P1020447.jpg 
Views:	215 
Size:	94.1 KB 
ID:	372

    Check out how much larger the duroflex joints are vice the stock joints. I cant' wait to off road her to see how she flexes.

    Click image for larger version. 

Name:	P1020450.jpg 
Views:	216 
Size:	94.5 KB 
ID:	373

    Just a teeensy bit longer?

    Click image for larger version. 

Name:	P1020454.jpg 
Views:	212 
Size:	96.1 KB 
ID:	374

  4. #4
    Senior Member
    Join Date
    Feb 2014
    Location
    MD/PA line
    Posts
    425
    Arms going in!

    Click image for larger version. 

Name:	P1020452.jpg 
Views:	214 
Size:	93.2 KB 
ID:	376

    Click image for larger version. 

Name:	P1020453.jpg 
Views:	216 
Size:	92.7 KB 
ID:	377

    6-pack front shocks going in.

    Click image for larger version. 

Name:	P1020457.jpg 
Views:	229 
Size:	95.5 KB 
ID:	378

    Front shock mounts.

    Click image for larger version. 

Name:	P1020458.jpg 
Views:	211 
Size:	91.0 KB 
ID:	379
    Attached Thumbnails Attached Thumbnails P1020451.jpg  

  5. #5
    Senior Member
    Join Date
    Feb 2014
    Location
    MD/PA line
    Posts
    425
    Rear setup.

    Click image for larger version. 

Name:	P1020459.jpg 
Views:	208 
Size:	90.4 KB 
ID:	380

    Click image for larger version. 

Name:	P1020460.jpg 
Views:	209 
Size:	91.3 KB 
ID:	381

  6. #6
    Senior Member
    Join Date
    Feb 2014
    Location
    MD/PA line
    Posts
    425
    Here she is done and rolling. The alignment went well - the geometry wasn't hard to maintain with the Metalcloak kit. Only two minor things came up in the install and both were easily resolved.

    Click image for larger version. 

Name:	2014-02-28 09.29.55.jpg 
Views:	240 
Size:	97.1 KB 
ID:	382

    I got about 4.5 inches of lift up front and 3.75 inches of lift in the rear to bring her almost level. I expect to lose some of this with the install of my overline tube fenders and with the install the spare on the tailgate. Do note I have a hardtop or I'd probably be up a bit higher.

    Click image for larger version. 

Name:	2014-02-28 09.30.08.jpg 
Views:	210 
Size:	95.3 KB 
ID:	383

  7. #7
    Senior Member
    Join Date
    Feb 2014
    Location
    MD/PA line
    Posts
    425
    I drove her like this about 90 minutes through the countryside and then on the highway, and finally through a small town with roads torn up by the snowmageddon we've had this year. Let me tell you, she drives at least as good as stock, probably better.

    Click image for larger version. 

Name:	2014-02-28 12.02.05.jpg 
Views:	208 
Size:	97.1 KB 
ID:	384

    I didn't have any time to test the suspension before I had to give it to another shop, but I did find a small snow bank!

    Click image for larger version. 

Name:	2014-02-28 12.20.37.jpg 
Views:	208 
Size:	94.4 KB 
ID:	385

    6 packs again.

    Click image for larger version. 

Name:	2014-02-28 12.21.30.jpg 
Views:	205 
Size:	95.5 KB 
ID:	386

  8. #8
    This build is an 800lb gorilla. Complete tear out of pretty much every stock component.

    And the color scheme...... Love the throw back.

  9. #9
    Senior Member
    Join Date
    Feb 2014
    Location
    MD/PA line
    Posts
    425
    Thanks! I'm going for that late 70's CJ7 Golden Eagle look!

    Click image for larger version. 

Name:	074c-001large.jpg 
Views:	223 
Size:	99.1 KB 
ID:	388

    Either way, you're right. This was a bit build and thats why it took a while to do.

    I did the full Gamechanger install. I went with front and rear Artec Axle Armor, which went in well and looks tough as hell. I had to do an exhaust spacer to have the front shaft clear. Also went from factory 32s to 37KM2s. One jeep in, a completely different beast came out.

    When I get her back in a week, I'll be doing my metalcloak overline tube fender install. Also I'll get some better pics of the Artec kit and lift. I think a Rausch creek trip may be in order before spring officially arrives.

    Click image for larger version. 

Name:	2014-02-28 12.20.59.jpg 
Views:	252 
Size:	100.2 KB 
ID:	389

  10. #10
    Quote Originally Posted by Snarf77 View Post
    Thanks! I'm going for that late 70's CJ7 Golden Eagle look!

    Click image for larger version. 

Name:	074c-001large.jpg 
Views:	223 
Size:	99.1 KB 
ID:	388

    Either way, you're right. This was a bit build and thats why it took a while to do.

    I did the full Gamechanger install. I went with front and rear Artec Axle Armor, which went in well and looks tough as hell. I had to do an exhaust spacer to have the front shaft clear. Also went from factory 32s to 37KM2s. One jeep in, a completely different beast came out.

    When I get her back in a week, I'll be doing my metalcloak overline tube fender install. Also I'll get some better pics of the Artec kit and lift. I think a Rausch creek trip may be in order before spring officially arrives.

    Click image for larger version. 

Name:	2014-02-28 12.20.59.jpg 
Views:	252 
Size:	100.2 KB 
ID:	389
    That axle is soo pretty in gloss black. Black Betty may copy this.

Posting Permissions

  • You may not post new threads
  • You may not post replies
  • You may not post attachments
  • You may not edit your posts
  •