Close

Page 2 of 5 FirstFirst 1234 ... LastLast
Results 11 to 20 of 47
  1. #11
    Senior Member
    Join Date
    Feb 2014
    Location
    MD/PA line
    Posts
    425
    I'll be going through and sanding the finish off of the skull surface on the diff cover to bare metal, then using some chemicals to get a brown/red rust patina. Then I'll spray clear over the rusty skull! That's sure to add at least 10 horsepower.

    Seriously though. What are people doing about replacing the steering stabilizer? Does the stock one hold up well with 37s?

  2. #12
    Quote Originally Posted by Snarf77 View Post
    Seriously though. What are people doing about replacing the steering stabilizer? Does the stock one hold up well with 37s?
    Black Betty's components have been dealing with extra horsepower for the last 10k miles, and 37s for the last 4k. She still wears the stock steering stabilizer.

  3. #13
    Senior Member
    Join Date
    Feb 2014
    Location
    MD/PA line
    Posts
    425
    I have to think about the pinch seam sooner than later with these 37s too. Probably should start a new thread when I get to that.

  4. #14
    Quote Originally Posted by Snarf77 View Post
    I have to think about the pinch seam sooner than later with these 37s too. Probably should start a new thread when I get to that.
    Bring out the JB WELD! and make sure not to get moisture in that hole when cut them.

  5. #15
    Senior Member
    Join Date
    Feb 2014
    Location
    MD/PA line
    Posts
    425
    Quote Originally Posted by Rexx19 View Post
    Bring out the JB WELD! and make sure not to get moisture in that hole when cut them.

    Good idea. I'll be sure to do the work indoors and maybe hit it with the heat gun first to ensure I didn't get any water in the open space. JB weld to seal it all up then paint. Should be good to go.

  6. #16
    I did this recently.

  7. #17
    Senior Member
    Join Date
    Feb 2014
    Location
    MD/PA line
    Posts
    425
    So I put another 90 minutes of highway driving on Jesse's girl, at speed. I have to say now that the gamechanger lift actually handles better than stock. Mainly in the body roll arena. Its much more level around turns than I would have thought considering how much taller she is. Tomorrow I'll begin the fender installation process.

  8. #18
    Senior Member
    Join Date
    Feb 2014
    Location
    MD/PA line
    Posts
    425
    Having just had Jessee's girl xpel wrapped, I'm actually delaying the install a couple days. I was doing some thinking about how the bolts may affect the xpel when I crank them down on the exoskin. I'm thinking that if I don't do something to separate the xpel from the turning bolt, that I'll twist the xpel wrap under the bolt head.

    Click image for larger version. 

Name:	PTFEwasher.jpg 
Views:	170 
Size:	5.0 KB 
ID:	466

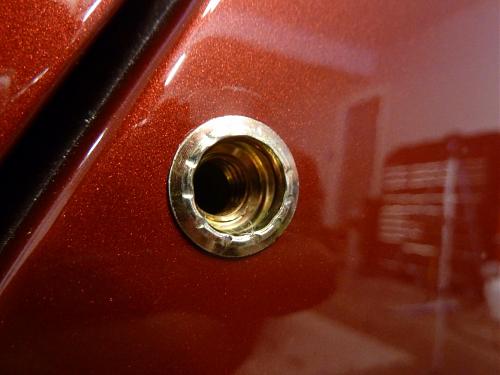
    I went ahead and ordered some 1/64 thick low friction PTFE washers to put under each bolt head, and also in between the exoskin and the rivet nuts that are all over the side of the jeep. The are far from flush and I'm thinking the daily vibration of driving would eventually cause the rivet nut wear through the finish and begin the corrosion process in between the OEM body and the inside of the exoskin. Overkill? Maybe, but other than time, its will only cost a couple bucks in washers.
    Click image for larger version. 

Name:	P1020437.jpg 
Views:	147 
Size:	88.9 KB 
ID:	465

  9. #19
    Quote Originally Posted by Snarf77 View Post
    Having just had Jessee's girl xpel wrapped, I'm actually delaying the install a couple days. I was doing some thinking about how the bolts may affect the xpel when I crank them down on the exoskin. I'm thinking that if I don't do something to separate the xpel from the turning bolt, that I'll twist the xpel wrap under the bolt head.

    Click image for larger version. 

Name:	PTFEwasher.jpg 
Views:	170 
Size:	5.0 KB 
ID:	466

    I went ahead and ordered some 1/64 thick low friction PTFE washers to put under each bolt head, and also in between the exoskin and the rivet nuts that are all over the side of the jeep. The are far from flush and I'm thinking the daily vibration of driving would eventually cause the rivet nut wear through the finish and begin the corrosion process in between the OEM body and the inside of the exoskin. Overkill? Maybe, but other than time, its will only cost a couple bucks in washers.

    Click image for larger version. 

Name:	P1020437.jpg 
Views:	147 
Size:	88.9 KB 
ID:	465
    This move is brilliant. I have twisted the wrap when someone who didnt know what they were doing tightend my flare on. Im planning to replace the whole section of wrap in that area because it drives me nuts.

  10. #20
    Senior Member
    Join Date
    Feb 2014
    Location
    MD/PA line
    Posts
    425
    The whole process worked out pretty well. I was able to get both rear exoskin pieces installed after work today. Probably about 3 hours to do them both. With the rivet nuts, you have to spend some time getting every single bolt lined up, then there are aluminum stand offs that have to get installed and various complication. I have a rather large hand and you have to wind your hand down into the fender through the tail light area to get some nuts and bolts tightened, and then get a wrench in there to keep it from spinning. All said and done, it turned out well. Once the exoskin installs, the fenders/flares take only a couple minutes to pop on.

    Click image for larger version. 

Name:	2014-03-11 18.39.31.jpg 
Views:	141 
Size:	91.4 KB 
ID:	469

    Finished:

    Click image for larger version. 

Name:	2014-03-11 20.25.06.jpg 
Views:	143 
Size:	90.0 KB 
ID:	470

    Now I have to get my fender wells lined and do the fronts tomorrow and Thursday!

Posting Permissions

  • You may not post new threads
  • You may not post replies
  • You may not post attachments
  • You may not edit your posts
  •